Table of contents

Inside RevoZport’s Audi RS6 C8 Street Program

Street
在日本行驶的白色 Audi RS6 C8 Avant,配备 RevoZport Street Program 组件

The Audi RS6 C8 Avant does not need help looking fast. RevoZport’s brief was more precise: give the lower body, bonnet and rear treatment enough visual weight to match the car, without turning the Avant into a widebody conversion or a catalogue of unrelated carbon parts.

The result is a seven-component Street Program designed by RevoZport as one complete exterior. It can be ordered as a full program or built in stages, depending on which part of the car you want to change first.

Explore the complete Audi RS6 C8 Street Program or continue below for the design reasoning behind every component.

RevoZport Audi RS6 C8 Street Program front three-quarter design render
The program was drawn as one front-to-rear composition. Render shown for design reference.

The RS6 C8 Street Program at a glance

  • Vehicle: Audi RS6 C8 Avant, listed by RevoZport for 2020+ vehicles. Confirm your exact year, market and specification before ordering.
  • Program: seven coordinated exterior components, available together or individually.
  • Design direction: a stronger front, a more connected side profile and greater depth at the rear, while retaining the original Audi body language.
  • Fitment direction: plug-and-play, OEM-style integration with no cutting or drilling required unless the relevant product page states otherwise.
  • Current finish direction: Carbon Fiber and Gloss Black are the common listed choices on most components. Component-specific and special-finish availability should be confirmed before ordering.

Why RevoZport developed an original RS6 program

The C8 is already broad-shouldered and recognisably an RS6. RevoZport did not set out to imitate another tuner’s kit, relabel a replica or convert an A6 into an RS6. This is an original RevoZport design program for the genuine RS6 C8 Avant.

Our starting point was the relationship between the car’s upper and lower body. The factory sheet metal carries plenty of presence, but the lower front edge, long side profile and rear bumper read more quietly. Adding one oversized part would have made that imbalance worse. The design therefore works in three connected areas: pressure at the front, grounding through the side and depth at the rear.

The carbon hood has a separate job. It gives the top of the front end a character that is less closely related to the wider A6 and S6 family. Together, these decisions make the program read as one RS6 rather than seven accessories.

Seven components, one design

The complete program includes a front lip, front grille, front canards, hood, side skirts, rear diffuser and roof spoiler. Each item is sold separately as well, so an owner can choose a focused change without committing to the full exterior in one order.

Front lip: establishing the lower edge

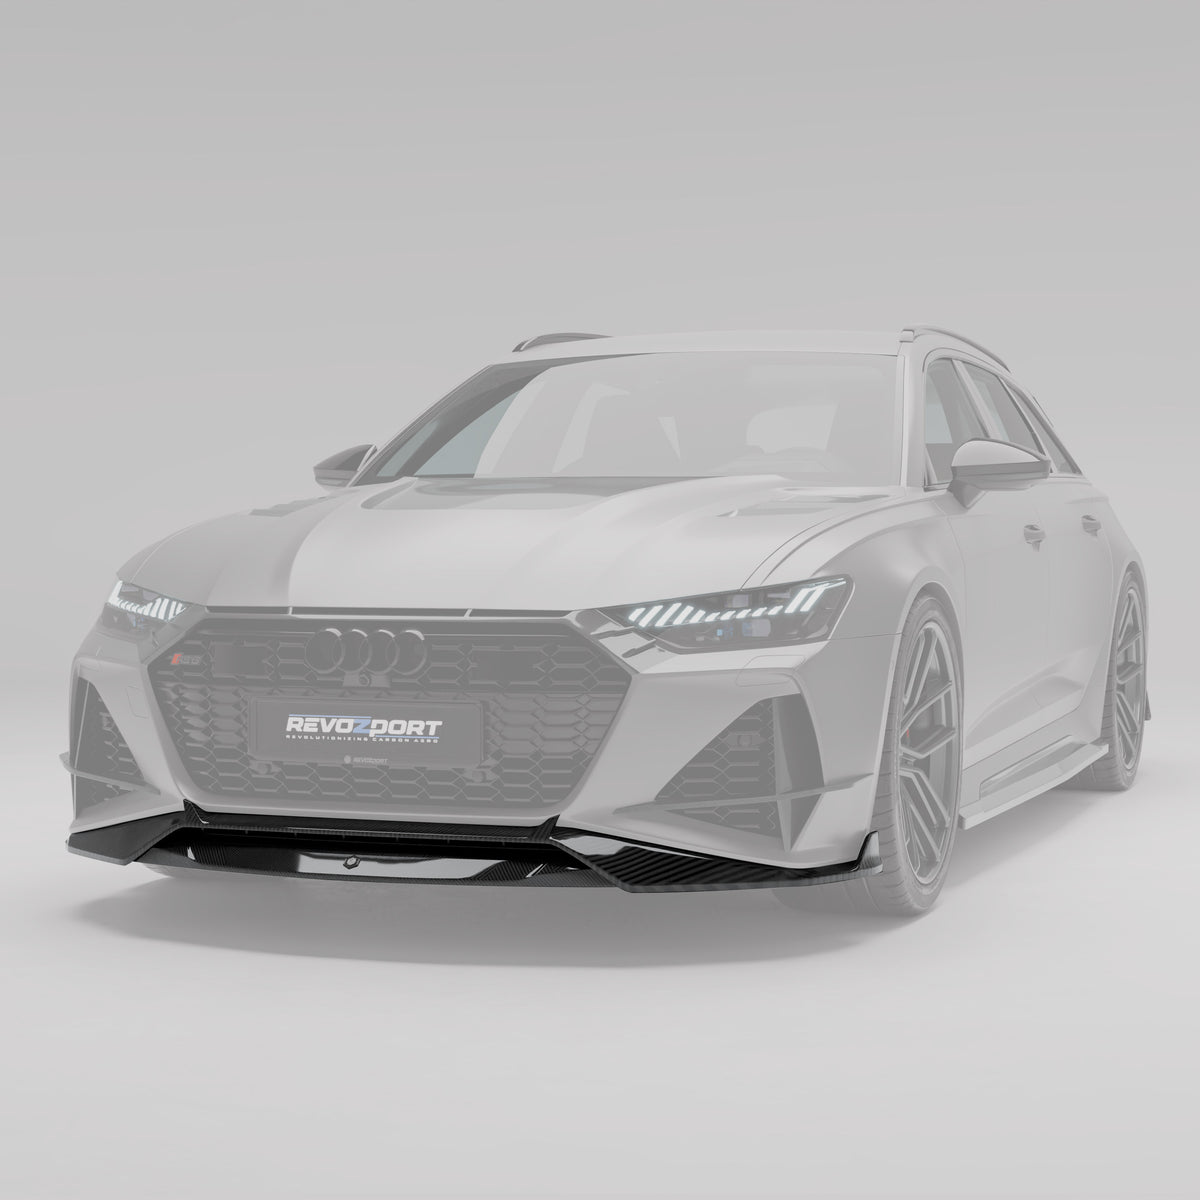
The RS6 C8 front lip creates the visual base for the front bumper. Its purpose is not to make the car look like a race conversion. It gives the clean factory bumper a firmer lower boundary and lets the grille, canards and hood sit within a more deliberate front composition.

Audi RS6 C8 carbon fiber front lip by RevoZport
The front lip gives the lower bumper a clearer visual base.

Front grille and canards: defining the centre and corners

The carbon fiber front grille concentrates attention in the centre of the car. The front bumper canards then add definition at the outer corners. Used together, the centre and corners feel related; used separately, either part can provide a more restrained change.

We use the term canards because that is the product name, but the design story here is visual. RevoZport does not make a downforce claim for these Street Program pieces in this article.

Carbon hood: changing the character of the front

The RS6 C8 carbon fiber hood, or bonnet, is the most decisive front-end component. The factory bonnet is intentionally restrained and shares its basic visual relationship with the wider A6/S6 family. RevoZport’s hood gives the RS6 a more specific upper-front identity and connects the lip, grille and canards across the full height of the nose.

RevoZport carbon fiber hood fitted to the Audi RS6 C8 Avant
The hood changes the upper front section, not only the lower bumper.

Side skirts: connecting a long Avant profile

An Avant has more visual length to resolve than a coupe or short saloon. The carbon fiber side skirts extend the lower line between the front lip and rear diffuser. They make the side view feel more connected and visually lower without changing the factory width of the body.

Audi RS6 C8 Avant carbon fiber side skirts by RevoZport
The side skirts join the front and rear treatments along the Avant’s long lower body.

Rear diffuser: adding the missing lower-bumper depth

From RevoZport’s design perspective, the standard diffuser is the quietest part of the factory exterior. The carbon fiber rear diffuser adds structure around the exhaust area and gives the rear bumper a more substantial lower section. It is the strongest single rear change in the program.

Roof spoiler: completing the upper rear line

The carbon fiber roof spoiler works at the opposite edge of the tail. Its role is to sharpen the end of the roofline and balance the visual weight added by the diffuser below. It is a roof spoiler, not a rear wing.

RevoZport Audi RS6 C8 Street Program rear three-quarter design render
The diffuser and roof spoiler resolve the lower and upper edges of the rear. Render shown for design reference.

Complete program or individual components?

There is no single correct order. The useful question is which view of the car you want to change first.

  • For the complete composition: choose the full RS6 C8 body kit. This keeps the front, side and rear on the same design level.
  • For a front-first setup: begin with the front lip and grille. Add the hood when you want the upper front to change as clearly as the lower bumper. Canards provide the final outer-corner detail.
  • For a rear-first setup: begin with the diffuser. Add the roof spoiler to balance the lower and upper edges of the tail.
  • For a continuous side view: the side skirts make most sense once the front lip or rear diffuser is also part of the plan.
  • For one decisive component: the hood makes the largest change to the front character; the diffuser makes the largest change to the rear.

This staged approach is also useful for owners who want to spread the project across more than one installation visit. The RS6 collection keeps the complete kit and every individual component together.

Carbon Fiber, Gloss Black and special finishes

Most current RS6 component listings present two clear directions. Visible Carbon Fiber makes the weave part of the design. Gloss Black creates a quieter, dark finish and uses a basalt-fiber construction rather than visible carbon weave.

Matte carbon, forged carbon and other special-finish requests should be confirmed component by component before ordering. Availability can change, and a finish that exists for one part should not be assumed to exist for all seven. If the car has Audi Black Optics or factory matte carbon details, send clear photographs to the Setup Advisor so the closest direction can be discussed before production.

Real Audi RS6 C8 builds

Renders are useful for understanding design intent. Installed cars show whether the program still belongs on a working Avant. These customer and partner builds demonstrate four different visual outcomes. They are shown as design references; the exact installed component list varies by vehicle and should not be inferred from a single photograph.

Japan: the full profile in motion

White Audi RS6 C8 Avant with RevoZport Street Program components driving in Japan
The moving three-quarter view shows how the lower front and side treatment read across the Avant’s full length.

EU white build: maximum contrast

White European Audi RS6 C8 Avant with visible RevoZport carbon components
On a white car, the boundary between the factory body and the dark lower components is easy to read.

EU black build: quieter integration

Black European Audi RS6 C8 Avant with RevoZport Street Program components
Dark-on-dark bodywork makes the same program read with less contrast and a more understated finish.

Wuhan: front-end definition on a black car

Black Audi RS6 C8 Avant with RevoZport front components in Wuhan
The low front three-quarter angle shows how the lip, centre and bumper corners work together without relying on colour contrast.

View more RevoZport Street Program builds in the Gallery.

OEM-style fitment without turning the order into a technical exercise

Standard RevoZport Street Program components are engineered for plug-and-play, model-specific integration using the vehicle’s existing mounting locations, with no cutting or drilling required unless the relevant product page explicitly states otherwise. Test-fitting before final installation is still good practice, especially when several panels meet or when a special finish has been ordered.

The live collection lists this program for the Audi RS6 C8 Avant from 2020 onward. Before ordering, confirm the vehicle’s model year, market, trim and any relevant camera or sensor specification. That is not meant to make fitment complicated; it prevents a simple naming assumption from becoming an expensive shipping mistake.

For the hood, grille, bonded spoiler and any multi-part installation, an experienced body and carbon-fiber installer can also help with panel alignment, transfer of factory items and finish protection. Product-specific instructions take priority over any general statement in this article.

What to confirm before ordering

  1. Your RS6 C8 Avant model year, market and trim.
  2. Whether you want the complete seven-component program or a staged setup.
  3. The exact finish for every selected component.
  4. Any factory exterior package, camera or sensor details relevant to the selected part.
  5. Your installer and preferred delivery timing, particularly for the oversized hood or a complete kit.

Send the Setup Advisor a photograph of the car, the model year and the parts you are considering. The team can then help organise a coherent setup instead of treating each component as a separate purchase.

Frequently asked questions

Is the RevoZport RS6 C8 Street Program an original design?

Yes. It was designed by RevoZport as one coordinated RS6 C8 exterior program. It is not a relabelled replica, an A6-to-RS6 conversion or an imitation of another tuner’s kit.

What is included in the complete RS6 C8 program?

The complete program combines seven items: front lip, front grille, front canards, hood, side skirts, rear diffuser and roof spoiler. Check the live complete-kit product before ordering because product specifications can be revised.

Can I buy the parts individually?

Yes. Every component is listed separately, and the full body kit is available for owners who want the complete composition.

Is this a widebody kit?

No. The Street Program works with the factory RS6 C8 Avant body rather than converting it into an extreme widebody.

Does installation require cutting or drilling?

Standard Street Program components are designed for plug-and-play, OEM-style fitment with no cutting or drilling. If a component requires anything different, the relevant product page or installation instructions will state it.

Which model years are supported?

The live collection lists the Audi RS6 C8 Avant from 2020 onward. Confirm the exact year, market and vehicle specification with RevoZport before ordering.

Is Gloss Black the same as visible carbon fiber?

No. RevoZport’s current Gloss Black option uses a basalt-fiber construction and provides a uniform dark appearance rather than a visible carbon weave.

Can RevoZport help me choose a setup?

Yes. Share your vehicle year, market, photographs and preferred finish with the Setup Advisor. The team can help compare a complete program with a staged component plan.

Build your RS6 C8 Street Program

The strongest setup is not automatically the one with the most parts. It is the one in which the front, side and rear feel intentional together. Start with the complete program, compare the individual components, or speak with a specialist before ordering.

Shop the Audi RS6 C8 Street Program

Explore the complete seven-component body kit

Ask the RevoZport Setup Advisor on WhatsApp or email contact@revozport.com.

Explore Our Full Range of Tuning Accessories

0 条评论

发表评论

You Might Also Like To Read

Audi RS7 C8 Body Kit Guide: Front Lip, Diffuser, Spoiler or Full Kit?
Street

July 31, 2026

Audi RS7 C8 Body Kit Guide: Front Lip, Diffuser, Spoiler or Full Kit?

The right Audi RS7 C8 body kit depends on which area of the Sportback you want to develop. A front lip gives the nose a lower, sharper edge. Side skirts extend that line along the profile, while a diffuser or spoiler adds more definition at the rear. A full kit creates the most consistent change across all three areas. This guide compares each option by visual impact, fitment, installation scope, and build direction, helping you choose the setup that suits your Audi RS7 C8. Where Should You Start With an Audi RS7 C8 Body Kit? A front lip creates one focused exterior change. A three-part lower package establishes a balanced street setup, while the complete kit develops one front-to-rear carbon design. Each route creates a different visual result. For a staged installation, the first component should support the intended final build direction. One-Part Starting Point A front lip is the clearest single-part starting point for an otherwise factory Audi RS7 C8. It gives the lower bumper a firmer base and adds visible carbon at the car’s leading edge. The RS7 already has a broad Singleframe grille, large outer intakes, and narrow headlights. A model-specific lip follows this existing width and strengthens the lower edge of the factory bumper. This direction suits a restrained build with standard side skirts and rear bodywork. It also gives the installer an early opportunity to check ground clearance, weave direction, clear-coat quality, and the way the carbon finish works with the factory paint. Lip depth should follow the final exterior plan. A restrained profile works naturally with an otherwise standard car, while a deeper front treatment benefits from related side and rear components. Balanced Street Setup A front lip, side skirts, and rear diffuser create a balanced lower package for a road-focused RS7. Together, they form a continuous line from the front bumper, along the Sportback profile, and into the rear exhaust area. The front lip establishes the lower position at the nose. Side skirts carry that line across the wheelbase, and the diffuser adds depth beneath the rear bumper. This gives the car more definition from each main viewing angle while preserving the factory roofline, shoulder line, and tailgate. This setup also keeps the hood and factory grille in place, making it suitable for owners who want a coordinated exterior with carbon concentrated along the lower body. The first components establish the weave direction, gloss level, and visible carbon tone for the build. Later additions should follow the same finish specification so the lower package reads as one design. Complete Carbon Package A complete Audi RS7 C8 body kit suits a project built around one front-to-rear carbon direction. The front lip, grille, canards, hood, side skirts, diffuser, and trunk spoiler can be planned as one exterior system. A well-composed package still needs a clear hierarchy. The front establishes width and central structure, the side skirts create continuity, and the rear components complete the fastback profile. The complete package also supports finish coordination. Paired components can be inspected together, while weave direction, carbon tone, and clear-coat quality can be compared across the full set. Installation planning for the complete package includes hood alignment, latch engagement, sensor clearance, trim transfer, spoiler movement, panel preparation, and workshop time. These requirements form part of the project scope alongside the carbon components. How Should Carbon Aero Follow the RS7 C8’s Shape? Carbon aero should reinforce the Audi RS7 C8’s width, lower body line, and fastback profile through forms that follow the factory surfaces. The RS7 combines a low, wide Sportback body with pronounced wheel arches and a sweeping rear profile. The broad Singleframe grille defines the front, while the rear brings together the spoiler line, full-width light treatment, and lower diffuser area. These relationships provide the foundation for an integrated carbon program. Front-End Hierarchy The front of the RS7 benefits from stronger definition at its lower edge and center. A front lip gives the bumper a firmer base, while the grille and canards add structure around the Singleframe design. A carbon hood covers a much larger visible area, so its shape carries more influence than a smaller trim component. The hood should follow the existing body lines and meet the fenders, bumper, and windshield area with controlled gaps. RevoZport’s RS7 Street Program treats the front lip, grille, canards, and hood as one related group. Together, they strengthen the lower bumper and central grille structure while preserving the Singleframe identity, headlight shape, and factory body width. Side-to-Rear Continuity The RS7’s long fastback profile needs a continuous transition between the front and rear. Side skirts carry the lower edge across the wheelbase and give the Sportback a more planted stance beneath the factory shoulder line. At the rear, a rear diffuser adds depth around the exhaust area and gives the lower bumper a clearer frame. Its outer edges should meet the side-skirt treatment through a similar depth and surface direction. The replacement trunk spoiler completes the upper rear line. RevoZport’s RS7 component follows the original trunk-spoiler layout and fastback profile, with its mounting position and clearance preserving movement throughout the factory spoiler’s operating range. Complete Design Versus Collected Parts A complete design repeats related lines, depths, and surface treatments around the vehicle. The front lip, side skirts, diffuser, and spoiler should look connected from the main front, side, and rear viewing angles. Material consistency is only one part of that relationship. Edge profiles, corner shapes, component depth, weave direction, and clear-coat appearance also influence whether the finished car reads as one design. A model-specific program helps maintain a consistent relationship between the nose, sill line, and fastback tail while preserving the RS7’s original roofline, shoulder line, and tailgate curvature. How Should an Audi RS7 C8 Body Kit Be Matched to the Car? An Audi RS7 C8 body kit should follow the exact vehicle specification, material finish, mounting method, and installation scope. Model year, market specification, factory equipment, and previous body modifications all affect component clearance, mounting points, panel alignment, and installation planning. Vehicle and Equipment Match RevoZport’s RS7 C8 Street Program is developed for the Audi RS7 C8 Sportback from 2019 onward. The program covers the front lip, grille, canards, hood, side skirts, rear diffuser, and trunk spoiler. Parking sensors, cameras, driver-assistance equipment, trim packages, exhaust configuration, and previous body repairs all form part of the fitment plan. Front components require clearance around sensors and adjacent trim, while the hood must engage the factory latch and move freely around the fenders, bumper, and windshield area. The replacement trunk spoiler follows the original trunk-spoiler layout and fastback rear profile. Correct fitment preserves its mounting position, clearance, and movement throughout the factory spoiler’s operating range.On a staged or mixed-component build, the side-skirt and diffuser edge positions establish how the two components meet around the rear quarter and continue the same lower-body line. Material and Finish Match The RS7 program uses model-specific prepreg dry-carbon construction, controlled curing, and automotive exterior finishing. Toray prepreg carbon forms RevoZport’s general material standard. Finish consistency becomes more visible as component size increases. A carbon hood covers a broad surface, so its weave direction, resin appearance, clear-coat depth, gloss, and edge coverage should match the smaller front, side, and rear pieces. Compare paired parts together and inspect staged additions beside the carbon already installed on the car. Natural light makes differences in weave direction, gloss, and clear-coat tone easier to identify. Installation Scope Professional installation is recommended for exterior carbon components. Every part should be dry-fitted before final attachment, drilling, adhesive application, or trim transfer.Installation quality depends on mounting-hole, clip and bracket alignment, consistent panel gaps, flushness, and left-to-right symmetry. The hood requires reliable latch engagement and unrestricted opening movement, with adequate clearance around sensors, exhaust outlets, cameras, and surrounding trim. Adhesive-mounted components require clean surface preparation and controlled positioning. Mechanically mounted parts should rest naturally against their contact points before the fasteners are tightened evenly. Paint protection film should be incorporated into the installation sequence. When PPF covers both painted panels and carbon components, its edges should follow the mounting points, panel joints, and removable parts. How Does RevoZport Build a Complete RS7 C8 Carbon Aero System? RevoZport treats the RS7 C8 as one connected front, side, and rear composition. The Street Program includes a front lip, grille, canards, hood, side skirts, rear diffuser, and replacement trunk spoiler. Each component has its own role, while the complete program follows the same model-specific lines, material finish, and visual direction. RS7-Specific Design Priorities At the front, the program strengthens the bumper’s lower edge and gives the center around the Singleframe grille more structure. The canards add definition at the outer sections, while the hood extends the carbon finish across a larger surface. Along the profile, the side skirts establish a continuous lower line beneath the factory shoulder treatment. This gives the Sportback a more planted appearance while preserving its fastback roofline. The rear diffuser adds depth around the exhaust area, and the replacement trunk spoiler completes the upper edge of the tail. Its position follows the RS7’s original trunk-spoiler layout and tailgate curvature. The Singleframe grille, fastback roof, shoulder line, and tailgate remain the dominant Audi elements. The carbon components strengthen the lower front bumper, side-sill line, and rear treatment within those original proportions. Carbon Construction and Fitment Inspection The RS7 components use prepreg dry-carbon construction, controlled curing, and automotive exterior finishing. Each part should receive a visual and dimensional inspection before installation. Mounting points and panel position establish the basis of the fitment inspection. Holes, clips, and brackets should align naturally, while panel gaps, flushness, and left-to-right symmetry should remain consistent. The hood requires a complete movement assessment because it interacts with the hinges, latch, fenders, bumper, and windshield area. Final adjustment should preserve latch engagement, opening movement, and surrounding clearance. Visible carbon should maintain a consistent weave direction and symmetry between paired components. Clean edges, minimal weave distortion, and a surface free from pinholes, dry areas, and heavy resin accumulation support a refined finish. The clear coat should show uniform gloss, complete edge coverage, and a clean surface without runs, fisheyes, excessive orange peel, or dust inclusions. Adhesion, weathering resistance, and anti-yellowing performance also affect the long-term exterior finish. Complete Kit or Individual Components The complete Audi RS7 body kit offers the most consistent route when the front-to-rear exterior direction has already been decided. Individual components suit a restrained build or a staged project. A front lip creates the strongest isolated change, while the front lip, side skirts, and rear diffuser form a balanced lower package without replacing the grille or hood. For a staged build, the first components establish the weave style, orientation, gloss level, and finish specification. An early view of the final component combination helps each later addition continue the same visual direction. Which Audi RS7 C8 Body Kit Setup Should You Choose? The intended final profile and installation scope define the most suitable Audi RS7 C8 body kit configuration. A front lip suits an otherwise factory RS7 that needs stronger definition at the nose. Adding side skirts and a rear diffuser creates a balanced street setup with a continuous lower line. The complete Street Program fits a project built around one carbon direction across the front, profile, and fastback rear. The final setup should reflect the exact vehicle specification, finish, mounting method, wheel position, and trunk-spoiler movement. A well-planned result preserves the RS7’s Singleframe identity, roofline, shoulder line, and tailgate curvature while giving the lower body and rear profile greater definition. Frequently Asked Questions Does an RS7 C8 Carbon Body Kit Need PPF? No. PPF is optional, but it can help protect forward-facing carbon parts from stone chips and surface wear. The front lip, canards, grille area, and hood receive more road debris than a trunk spoiler. Film installation follows completed fitment and surface-quality assessment, with its edges planned around mounting points, panel joints, and removable parts. How Do You Keep Carbon Finishes Consistent Across a Staged Build? The first components establish the weave style, weave direction, gloss level, and finish reference for the build. Each later addition should be compared with the installed carbon in natural light before fitting. Finish consistency becomes especially important where two carbon components meet along the same body line. Should Wheels Be Planned Before or After the Body Kit? The wheels and Audi RS7 body kit should be planned as one system. Wheel diameter, offset, tire profile, suspension height, and lower aero all contribute to the car’s final stance. The installed wheel position should reinforce the visual relationship between the front lip, side skirts, and rear diffuser, creating a continuous lower-body profile. Can Individual Body Kit Parts Be Replaced After Damage? Yes. An individual component can usually be replaced when the matching construction and finish remain available. Replacement planning begins with the brackets, mounting points, painted panels, and adjoining carbon. A dry fit establishes how the replacement’s weave direction, gloss, panel alignment, and edge position relate to the parts remaining on the car.
C7 Corvette Widebody Kit
Aero

July 31, 2026

C7 Corvette Widebody Kit Guide: Model Fitment, Aero Setup and Installation

The right C7 Corvette widebody setup starts with the body already fitted to your car. A Stingray conversion and a factory-widebody aero build require different panels, wheel positions, clearances, and installation plans. Stingray and Z51 models use the narrower factory body. Grand Sport, Z06, and ZR1 models have factory-widebody bodywork, although their bumpers, hoods, rear fascias, cooling layouts, and aero components can differ by trim. This guide explains how C7 body configurations affect aero-component fitment, wheel clearance, and installation. It also covers complete and phased aero setups, the measurements needed for wheel selection, and the differences between street, track-day, and competition builds.  Is Your C7 Corvette Already a Factory Widebody? A C7 Corvette has factory-widebody bodywork if it is a Grand Sport, Z06, or ZR1. Stingray and Stingray Z51 models use the narrower factory body. The starting body configuration affects fender coverage, bumper interfaces, wheel position, inner liners, cooling paths, and rear bodywork. Identify the exact trim and body style before comparing C7 Corvette body kits. C7 Model Factory Body Type Published RevoZport Fitment Z06 Coupe Factory widebody Front fenders, hood, side skirts, and rear diffuser ZR1 Coupe Factory widebody Front fenders, hood, side skirts, and rear diffuser For Stingray, Z51, and Grand Sport models, component fitment also varies by Coupe or Convertible body style and by the vehicle’s factory bumper configuration. The VIN, trim, body style, and bumper interfaces establish how each selected part fits the surrounding bodywork. Z51 is a performance package fitted to the narrower Stingray body. The C7 Grand Sport uses wider rear fenders and Z06-derived exterior features, while the Z06 and ZR1 have their own hood, bumper, cooling, and aero configurations. The RevoZport front fenders, hood, side skirts, and rear diffuser are configured for the C7 Z06 Coupe and C7 ZR1 Coupe. For the front splitter and rear wing, match the component to the model year, trim, Coupe or Convertible body style, factory bumpers, and adjoining bodywork when planning the complete C7 Corvette widebody setup.  A complete fitment record brings together the VIN, trim, Coupe or Convertible body style, factory bumpers, hood type, and clear photos of the car. These details connect the selected panels with their adjoining components and support a coherent final setup. How Does a Complete C7 Corvette Widebody Aero System Work? A complete C7 Corvette widebody aero system manages airflow from the front splitter to the rear wing as one coordinated package. Each component changes the airflow reaching the next section of the car. RevoZport’s Corvette C7 Carbon Fiber Configurator combines a front splitter, dual-element rear wing, diffuser, +20 mm front fenders, vented hood, and side skirts into one CFD-developed aero package. In this complete configuration, the system is rated at more than 3,000 lb of CFD-predicted downforce at 180 mph. The front and rear components work together around a defined aerodynamic balance. Ride height, rake, wing angle, underbody airflow, and suspension movement all influence how that load is generated and distributed on the car, making chassis setup an integral part of the complete C7 widebody system. Front Splitter, Hood, and Fenders The front splitter, hood, and fenders manage front-end pressure, cooling flow, and wheel-well air before that airflow reaches the middle of the car. A front splitter divides incoming air between the upper body and the underfloor. RevoZport’s design uses large tunnels to accelerate air below the nose and support a lower-pressure area beneath the splitter. Removable endplates add practical flexibility for trailer clearance, transport, repairs, and different track configurations. Recheck the front-to-rear aero balance after changing the endplate setup because the plates influence how air leaves the splitter edges. The vented hood gives radiator discharge air a planned route out of the engine bay. Its central vent helps the cooling stream leave through the hood instead of adding pressure beneath the front bodywork. Vented front fenders provide an extraction path for air around the rotating tires. This supports wheel-well pressure management, while the inner liners help control debris, water, heat, and airflow around the tire. The C7 widebody kit uses +20 mm front fenders to establish its wider front profile. Build the wheel package around the installed panel position, measuring inner suspension clearance, outer fender clearance, full-lock movement, and usable suspension travel before setting the wheel width, offset, and tire section width. Verify the final position with a wheel template or physical test fit.  Mid-Splitter and Side Skirts The mid-splitter and side skirts connect front airflow management with the rear diffuser, creating a continuous path through the center of the aero system. RevoZport’s mid-splitter uses NACA ducts and underbody strakes. The ducts feed high-pressure air toward cooling areas, while the strakes guide part of the underfloor stream away from the diffuser’s working path. This supports cleaner and more stable airflow farther back. Side skirts help limit higher-pressure air entering beneath the car from the sides. Their vertical vanes also direct air outward to manage pressure around the underbody and tire wake. This center section depends on consistent geometry. Ride height, rake, suspension movement, and underbody-panel position all affect the airflow reaching the diffuser. A standalone mid-splitter can still influence cooling and underbody flow, while the published complete-system CFD figure applies to the coordinated aero configuration. Rear Diffuser and Wing The rear diffuser and wing create aerodynamic load through different airflow paths. Their combined balance is more useful than either component’s peak figure on its own. A rear diffuser expands the underbody airflow as it exits behind the car. Its profile and strakes help maintain attached flow, manage crossflow from the rear tires, and support a lower-pressure area beneath the rear floor. RevoZport uses a deliberately controlled diffuser size to preserve its interaction with the rear-wing wake. The diffuser’s profile, expansion angle, and strake arrangement must work with the complete rear-aero configuration. The dual-element rear wing works in the airflow leaving the roof and rear hatch. Changing the second element’s angle of attack adjusts rear load and drag. A steeper setting can add rear load while moving the aerodynamic balance rearward. A usable track setup keeps the front and rear axles working together. Match rear-wing adjustment with front aero, then evaluate the result through driver feedback, tire temperatures, ride-height data, and repeatable lap comparisons. Can C7 Widebody Aero Components Be Installed Individually? Selected C7 widebody components can be installed in stages. A vented hood, front fenders, or side skirts can serve as individual upgrades when matched to the adjoining factory bodywork. The front splitter, mid-splitter, rear diffuser, and rear wing have a stronger influence on airflow and aero balance, so their mounting position and relationship to the complete package should be planned from the beginning. A phased build works best when each early component supports the intended final configuration. Hood and fender installation centers on panel alignment, cooling paths, wheel clearance, and adjoining trim. Splitters and side skirts depend more heavily on ride height and underbody connections, while the diffuser and rear wing bring rear airflow and structural mounting into the setup. Street-Focused Setup For a road-driven C7 Corvette widebody, prioritize usable ground clearance, secure mounting, service access, and components that remain easy to inspect. The splitter should clear common driveways and ramps, while jacking points and routine service areas remain accessible. Hood and fender vents also need to manage heat, rain, and road debris without compromising surrounding components. A moderate front-to-rear package usually delivers better road usability than one aggressively configured component. RevoZport’s guide to street aero vs track aero explores how these priorities change between daily driving and occasional track use. Track-Day Setup A track-focused C7 needs coordinated front and rear aero, open cooling paths, supported splitter mounting, compatible fender liners, and structural reinforcement beneath the rear wing bases. Wing angle, ride height, tire pressure, and tire temperature provide useful reference points as the setup develops. Adjust one variable at a time during testing. This makes changes in balance easier to trace and gives the driver a repeatable baseline for later sessions. Competition Setup Competition use adds rulebook limits for splitter projection, wing dimensions, ride height, and mounting position. Establish those dimensions before fabrication and keep exposed endplates, lower aero sections, and mounting hardware accessible for trackside service. Record wing position, ride height, alignment, tire data, and driver feedback after each setup change. A consistent log connects aerodynamic adjustments to the car’s behavior on track. What Wheels and Tires Fit a Widebody C7 Corvette? Wheel and tire fitment for a widebody C7 Corvette must come from physical measurements of the actual car. Calculate the new setup from the current wheel position, then verify it with a template or physical test fit. Brake clearance, suspension position, fender placement, alignment, tire dimensions, and intended use can differ between C7 builds. One wheel width, offset, and tire-size combination cannot represent every configuration. Wider Front Fender Effects Wider front fenders add outer tire-coverage space. Inner clearance beside the suspension, brake caliper, control arms, and liner remains a separate measurement. Wheel offset controls where the rim sits relative to the hub. A lower offset generally moves the wheel outward, while a higher offset moves it inward. Rim width and backspacing affect both the inner and outer wheel positions. The +20 mm designation identifies the front-fender specification. Final wheel offset should be calculated from the current wheel position and the installed fender location, then validated with a wheel template or physical test fit. Calculate front and rear fitment separately. Front-fender width does not determine the required rear-wheel position, and actual tire section width can vary between brands even when the sidewall size is identical. Required Wheel Measurements Start with the wheels already fitted to the car. Record their diameter, width, offset, backspacing, mounted tire width, ride height, and alignment. These figures give you a reliable baseline for calculating how the proposed setup will move inward and outward. Wheel fitment centers on three areas: Inner Clearance: The wheel and tire package needs adequate space around the suspension, brake caliper, control arms, liners, and brake hoses. Outer Coverage: Tire position is assessed against the installed fender at the current ride height and alignment. Dynamic Movement: Clearance is checked at full steering lock and throughout the usable suspension travel. Finish with a wheel template or physical test fit. Include any spacer in the calculation, along with its hardware and hub engagement, so the final check represents the complete wheel system. How Should You Plan C7 Widebody Fitment and Installation? Confirm the exact vehicle configuration, adjoining component interfaces, wheel position, and proposed mounting structure before installing a C7 widebody kit. This preparation helps the completed car maintain consistent panel gaps and a cohesive aero profile. Begin with the VIN, model year, trim, and body style. Record the factory bumper, hood, rear fascia, brake package, suspension, wheels, tires, and existing aero. Photos of the wheel wells, underbody, front bumper, and rear fascia are especially useful on cars with previous modifications. The installer should also record the current panel gaps, ride height, wheel position, and alignment before removing the factory components. These measurements provide a baseline for panel alignment and final clearance checks. Installation Process A refined installation begins with inspection and dry fitting. Inspect the carbon weave, clear coat, edges, mounting points, and overall panel shape while the shipping condition and packaging can still be documented. The hood and front fenders are replacement panels. Position them with the adjoining bumper, doors, liners, and side skirts temporarily in place. This allows the installer to set consistent gaps across the complete front section. The splitter, mid-splitter, side skirts, diffuser, and rear wing are externally mounted aero components. Install each part with its specified brackets, undertray interfaces, fasteners, and reinforcement. The splitter needs a mounting structure that transfers aerodynamic load into the intended support points, while the diffuser must align with the rear fascia, exhaust, and underbody. Secure the rear wing with its intended bases, reinforcement, mechanical fasteners, and specified backing plates. Follow the supplied drilling locations and installation sequence so the mounting structure can carry sustained aerodynamic load. The C7 Corvette widebody kit is designed for plug-and-play installation without trimming. The hood and front fenders replace the corresponding factory panels, while the splitter, side skirts, diffuser, and rear wing follow their component-specific mounting layouts. Final assembly includes panel alignment, suitable hardware, undertray interfaces, and structural reinforcement for the load-bearing rear wing.  At least two technicians familiar with carbon panels and track aero should position and align the larger components. Controlled support helps protect panel edges and keeps fastener loads even around the mounting points. After installation, inspect panel alignment, tire and suspension clearance, fastener security, aero-component movement, and wheel alignment before road or track use. Costs Beyond the Kit The complete project budget can include carbon components, oversize freight, shipping insurance, professional labor, surface preparation, wheel alignment, and related wheel or suspension changes. Low front aero can also affect vehicle transport. A trailer may need longer ramps, while removable splitter endplates can provide extra loading clearance. Track-focused builds may also benefit from spare endplates, fasteners, and contact-prone lower pieces. Build the labor estimate around the starting trim, previous modifications, selected components, panel preparation, reinforcement, and initial panel condition. Use current component, freight, and installation quotations when setting the final budget. Vehicle Information A complete fitment record includes the model year, trim, Coupe or Convertible body style, factory bodywork, wheel dimensions, offset, tire size, ride height, alignment, brake package, and suspension specification. Road use prioritizes practical clearance and service access. Track-day use places greater emphasis on cooling, aero balance, and repeatable adjustment, while competition use adds rulebook compliance, structural inspection, and trackside repair planning. Whether the build uses the complete system or selected Corvette performance parts determines how adjoining components are assessed as part of the final configuration. What Do C7 Owners Ask About Widebody Kits? Is a C7 Stingray a Factory Widebody? No. The C7 Stingray and Stingray Z51 use the narrower factory body. A widebody conversion requires a coordinated plan for the fenders, adjoining panels, liners, wheels, tires, and mounting points. Which C7 Corvette Models Have Factory-Widebody Bodywork? The C7 Grand Sport, Z06, and ZR1 have factory-widebody bodywork. Their bumpers, hoods, cooling components, rear fascias, and aero configurations can still differ by trim. Is a C7 Corvette Body Kit the Same as a Widebody Kit? No. A body kit can add splitters, side skirts, diffusers, and spoilers without changing fender width. A widebody conversion changes tire-coverage space through wider or replacement body panels. Does the RevoZport C7 Aero Program Fit a Stingray? The RevoZport front fenders, hood, side skirts, and rear diffuser are configured for the C7 Z06 Coupe and C7 ZR1 Coupe. A Stingray or Z51 build requires a model-specific fitment plan covering the bumpers, fenders, liners, wheels, tires, and mounting points. Can RevoZport C7 Aero Components Be Installed Separately? Yes. RevoZport lists individual C7 aero components, including the hood, fenders, side skirts, splitter, diffuser, mid-splitter, and rear wing. Match each selected part to the final fitment, mounting, cooling, and front-to-rear aero plan. Which C7 Corvette Widebody Setup Should You Choose? A successful C7 Corvette widebody build begins with the factory body configuration. Plan the fenders, wheel position, mounting structure, cooling paths, and front-to-rear aero balance as one system. Road cars need usable clearance and service access, while track and competition builds require stronger attention to cooling, adjustment, mounting, and rulebook limits. The final installation plan should reflect the model, year, body style, wheel measurements, and adjoining bodywork.
配备完整 RevoZport 碳纤维 Street Program 的 Audi RS7 C8 Sportback
Street

July 29, 2026

Inside RevoZport’s Audi RS7 C8 Street Program: Original Design, Installation & Real Build

The finished car explains the Audi RS7 C8 Street Program faster than a specification sheet. The carbon hood gives the upper nose its own identity, the three-piece front lip anchors the bumper, and the side and rear components carry the same line through to the tail. Nothing needs to shout on its own. This is the point of the RevoZport program: seven original components designed as one exterior, not a replica kit or a group of unrelated carbon add-ons. Owners can order the complete program or build it in stages, depending on which view of the car they want to change first. Explore the complete Audi RS7 C8 Street Program, view more real RS7 C8 builds in the RevoZport Gallery, or ask the RevoZport Setup Advisor to help plan your car. This RS7 C8 build at a glance Vehicle shown: Audi RS7 C8 Sportback. The exact model year and market were not supplied with the installation case. Installed program: front lip, front canards, front grille trim, carbon hood, side skirts, rear diffuser and trunk spoiler. Finish shown: visible carbon fiber with a gloss finish. Design direction: more definition at the front, a lower and longer side profile, and greater depth at the rear without converting the car into a widebody. Installation approach: test-fit first, establish the centreline, check symmetry and panel gaps, then complete the product-specific fixing process. Several components were laid out before installation so their condition, finish and compatibility could be checked together. Why RevoZport designed a complete RS7 program The factory RS7 already has the speed and presence expected from Audi's performance fastback. RevoZport's brief was not to make it look like another car, and it was not to copy an existing tuner package. The objective was to develop an original RevoZport exterior that could plausibly belong to the RS7 itself: stronger in the lower body, more distinctive across the bonnet, and visually complete from front to rear. That distinction matters in a market crowded with replica parts and relabelled designs. A single generic splitter may change one angle of the car, but it can also leave the rest of the body unresolved. The Street Program instead treats the nose, side profile and tail as one composition. The complete kit gives the clearest result, while the same logic allows individual components to work as deliberate stages. The completed front: hood, lip, canards and grille trim change both the upper and lower sections of the nose. The front: four components with separate jobs Three-piece front lip: the visual base The RS7 C8 carbon fiber front lip establishes a clean lower edge beneath the factory bumper. Its centre section and corner extensions make the nose read wider and closer to the road without adding the bulk of a replacement bumper. In this installation, the front was safely raised, the lower bumper was cleaned, and the three sections were trial-fitted before fixing. The centre was secured first and the installers worked outward, repeatedly checking the corner angle and left-to-right symmetry. Trial-fit before final fixing: the centre position and both corner extensions have to agree. Canards and grille trim: connecting the bumper details The front canards follow the outer intake and bumper geometry. The carbon front grille trim carries the material across the upper centre of the nose. Together, they prevent the lip from looking isolated at the bottom of the car. These are small pieces, but their alignment is unforgiving. The installation guide uses the bumper creases, intake lines and lower headlamp edges as visual references. The grille trim is positioned from the centreline; the canards are compared side to side for equal height and angle before the adhesive backing is removed. Carbon hood: the largest change to the front identity The RS7 C8 carbon fiber hood, or bonnet, changes the part of the nose that the smaller bumper components cannot reach. Its exposed-carbon surface and sculpted forms give the upper front its own character and make the lower pieces feel connected to a complete design. This is also the most precise installation in the program. The original bonnet gaps and height were recorded first. Transferable factory items such as the washer nozzles, insulation and latch were removed, and two people positioned the carbon hood. The hinge bolts stayed loose while the hood-to-fender gaps, leading-edge height, latch operation and under-bonnet clearance were checked. Only then were the fasteners tightened in sequence and the opening, closing and locking action tested again. Hood installation is a panel-alignment job, not simply a part swap. Factory hardware and the latch must operate correctly after the gaps are set. The side: extending the RS7's fastback line The RS7's roofline already gives the car length and movement. The carbon fiber side skirts continue that idea along the lower body. They connect the front lip to the rear treatment and make the side view read lower and longer without changing the factory body width. Before: the factory lower side remains visually quiet. After: the lower line now connects the front and rear of the fastback. The documented fitting process began with a clean lower sill and a full trial-fit from wheel arch to wheel arch. The installers located each skirt from the middle, worked toward both ends, and checked the result from a low angle so the height and lower edge matched on both sides. The rear: depth below, a clean finish above The rear diffuser is the strongest lower-rear change. It gives the exhaust area more structure and carries the carbon line around the bumper corners. The trunk-mounted rear spoiler works at the opposite edge and finishes the upper tailgate line. Before: the rear spoiler was already installed; the factory lower diffuser treatment remained. After: the diffuser adds lower depth while the trunk spoiler finishes the tailgate line. For the diffuser installation, the factory lower section was removed carefully so its clips and transferable items could be retained. The replacement was located from the centre, matched to the factory clip positions and checked around the exhaust openings and bumper corners before the lower fasteners were completed. The exhaust openings, factory clip positions and outer corner pieces all have to align before final tightening. The rear spoiler used a simpler process but still depended on the centreline. It was trial-fitted for equal spacing from both tailgate edges, then pressed from the centre outward. The spoiler follows the RS7 Sportback tailgate and is aligned from the centre outward. What this real installation proves A render can explain design intent. This car shows how that intent survives the practical work of mounting, transferring factory items and aligning several carbon components on one vehicle. The program reads as one design: the same visible-carbon direction continues from the front lip and hood to the side skirts, diffuser and trunk spoiler. Small pieces still need discipline: centreline, symmetry and equal gaps matter as much on the canards and grille trim as they do on the hood. OEM-style does not mean careless: the components follow the factory body and mounting logic, but correct trial-fitting and product-specific fastening remain essential. The car is not a widebody conversion: the Street Program develops the existing RS7 silhouette instead of replacing its identity. OEM-style fitment, explained honestly The RS7 Street Program is designed for model-specific integration with the factory body. No body cutting is described in this installation. The documented fitting process uses 3M automotive tape and screws at specified prepared or underside mounting locations, while the hood requires transfer and adjustment of factory hardware. That detail does not make the program a race-car installation; it is why the correct product instructions and an accurate trial-fit matter. Never assume one general sentence applies identically to all seven components. The relevant product page and current installation documentation take priority. The live collection lists the Street Program for the Audi RS7 C8 Sportback from 2019 onward. The exact year and market of the photographed car were not supplied with the case. Owners of an RS7 Performance or another market-specific specification should confirm the vehicle details before ordering. Complete program or individual components? The right route depends on which part of the RS7 you want to change first. For the complete composition: choose the complete RS7 C8 body kit, which brings all seven components into the same finish and design direction. For a front-first setup: begin with the front lip. Add the canards and grille trim for a connected bumper treatment; choose the hood when you want the upper nose to change just as clearly. For the side profile: the side skirts make the most sense when a front lip or rear diffuser is already part of the plan. For a rear-first setup: begin with the diffuser, then add the trunk spoiler to balance the lower and upper edges of the tail. For help before ordering: send the Setup Advisor a photograph, model year, market and the components you are considering. Most current RS7 component listings offer visible Carbon Fiber and a quieter Gloss Black direction. Availability differs by component, so confirm every selected finish rather than assuming one option exists across the full program. Before ordering Confirm that the car is an Audi RS7 C8 Sportback and provide its model year and market. State whether it is a standard RS7, RS7 Performance or another market-specific specification. Choose the complete program or list the exact individual components. Confirm the finish for every part. Share clear front, side and rear photographs if the car has a factory carbon package or other exterior options. Arrange a competent installer for the hood and any multi-component installation. Frequently asked questions Is the RevoZport RS7 C8 Street Program an original design? Yes. The seven components were developed as an original RevoZport program for the RS7 C8 Sportback. It is not a relabelled replica or an imitation of another tuner's kit. What is included in the complete RS7 C8 program? The current program combines a front lip, front canards, front grille trim, carbon hood, side skirts, rear diffuser and trunk spoiler. Check the live complete-kit product before ordering because specifications can be revised. Can the RS7 carbon parts be purchased individually? Yes. Every component is available as an individual product, while the complete body kit is the route for owners who want the full front-to-rear composition. Is this a widebody kit? No. The Street Program works with the factory RS7 C8 Sportback body. It adds definition and continuity without replacing the standard body with an extreme widebody conversion. Does installation require cutting or drilling? No body cutting is described. The case guide calls for 3M tape and screws; for the front lip it specifically instructs drilling at positions corresponding to the product's prepared mounting holes. The side skirts and diffuser use supplied self-tapping screws at prepared underside locations. Follow the current instructions for the exact component. Which Audi RS7 model years are supported? The live RevoZport collection lists the Audi RS7 C8 Sportback from 2019 onward. Confirm the exact model year, market and specification before ordering, especially for Performance or market-specific vehicles. Can RevoZport help plan a staged setup? Yes. Share the vehicle year, market, photographs, preferred finish and budget direction with the Setup Advisor. The team can compare a complete program with a staged front, side or rear setup. Explore more Audi RS7 C8 builds Compare four additional RS7 C8 cases from the RevoZport Gallery. Open the filtered Gallery to view each build and the RevoZport products documented with it. Romania RS7 C8 — VideoView build in Gallery → Romania RS7 C8 — Photo BuildView build in Gallery → Hebei RS7 C8 — ChinaView build in Gallery → Canada RS7 C8View build in Gallery → Build your Audi RS7 C8 Street Program The final result is strongest because no single component is carrying the entire car. The hood and lip establish the front, the side skirts continue the line, and the diffuser and trunk spoiler finish the Sportback at both rear edges. Choose the complete design, build it in stages, or ask RevoZport to help organise the setup before you order. Shop the Audi RS7 C8 Street Program Explore the complete seven-component body kit View more Audi RS7 C8 customer builds in the Gallery Ask the RevoZport Setup Advisor on WhatsApp or email contact@revozport.com.
在日本行驶的白色 Audi RS6 C8 Avant,配备 RevoZport Street Program 组件
Street

July 28, 2026

Inside RevoZport’s Audi RS6 C8 Street Program

The Audi RS6 C8 Avant does not need help looking fast. RevoZport’s brief was more precise: give the lower body, bonnet and rear treatment enough visual weight to match the car, without turning the Avant into a widebody conversion or a catalogue of unrelated carbon parts. The result is a seven-component Street Program designed by RevoZport as one complete exterior. It can be ordered as a full program or built in stages, depending on which part of the car you want to change first. Explore the complete Audi RS6 C8 Street Program or continue below for the design reasoning behind every component. The program was drawn as one front-to-rear composition. Render shown for design reference. The RS6 C8 Street Program at a glance Vehicle: Audi RS6 C8 Avant, listed by RevoZport for 2020+ vehicles. Confirm your exact year, market and specification before ordering. Program: seven coordinated exterior components, available together or individually. Design direction: a stronger front, a more connected side profile and greater depth at the rear, while retaining the original Audi body language. Fitment direction: plug-and-play, OEM-style integration with no cutting or drilling required unless the relevant product page states otherwise. Current finish direction: Carbon Fiber and Gloss Black are the common listed choices on most components. Component-specific and special-finish availability should be confirmed before ordering. Why RevoZport developed an original RS6 program The C8 is already broad-shouldered and recognisably an RS6. RevoZport did not set out to imitate another tuner’s kit, relabel a replica or convert an A6 into an RS6. This is an original RevoZport design program for the genuine RS6 C8 Avant. Our starting point was the relationship between the car’s upper and lower body. The factory sheet metal carries plenty of presence, but the lower front edge, long side profile and rear bumper read more quietly. Adding one oversized part would have made that imbalance worse. The design therefore works in three connected areas: pressure at the front, grounding through the side and depth at the rear. The carbon hood has a separate job. It gives the top of the front end a character that is less closely related to the wider A6 and S6 family. Together, these decisions make the program read as one RS6 rather than seven accessories. Seven components, one design The complete program includes a front lip, front grille, front canards, hood, side skirts, rear diffuser and roof spoiler. Each item is sold separately as well, so an owner can choose a focused change without committing to the full exterior in one order. Front lip: establishing the lower edge The RS6 C8 front lip creates the visual base for the front bumper. Its purpose is not to make the car look like a race conversion. It gives the clean factory bumper a firmer lower boundary and lets the grille, canards and hood sit within a more deliberate front composition. The front lip gives the lower bumper a clearer visual base. Front grille and canards: defining the centre and corners The carbon fiber front grille concentrates attention in the centre of the car. The front bumper canards then add definition at the outer corners. Used together, the centre and corners feel related; used separately, either part can provide a more restrained change. We use the term canards because that is the product name, but the design story here is visual. RevoZport does not make a downforce claim for these Street Program pieces in this article. Carbon hood: changing the character of the front The RS6 C8 carbon fiber hood, or bonnet, is the most decisive front-end component. The factory bonnet is intentionally restrained and shares its basic visual relationship with the wider A6/S6 family. RevoZport’s hood gives the RS6 a more specific upper-front identity and connects the lip, grille and canards across the full height of the nose. The hood changes the upper front section, not only the lower bumper. Side skirts: connecting a long Avant profile An Avant has more visual length to resolve than a coupe or short saloon. The carbon fiber side skirts extend the lower line between the front lip and rear diffuser. They make the side view feel more connected and visually lower without changing the factory width of the body. The side skirts join the front and rear treatments along the Avant’s long lower body. Rear diffuser: adding the missing lower-bumper depth From RevoZport’s design perspective, the standard diffuser is the quietest part of the factory exterior. The carbon fiber rear diffuser adds structure around the exhaust area and gives the rear bumper a more substantial lower section. It is the strongest single rear change in the program. Roof spoiler: completing the upper rear line The carbon fiber roof spoiler works at the opposite edge of the tail. Its role is to sharpen the end of the roofline and balance the visual weight added by the diffuser below. It is a roof spoiler, not a rear wing. The diffuser and roof spoiler resolve the lower and upper edges of the rear. Render shown for design reference. Complete program or individual components? There is no single correct order. The useful question is which view of the car you want to change first. For the complete composition: choose the full RS6 C8 body kit. This keeps the front, side and rear on the same design level. For a front-first setup: begin with the front lip and grille. Add the hood when you want the upper front to change as clearly as the lower bumper. Canards provide the final outer-corner detail. For a rear-first setup: begin with the diffuser. Add the roof spoiler to balance the lower and upper edges of the tail. For a continuous side view: the side skirts make most sense once the front lip or rear diffuser is also part of the plan. For one decisive component: the hood makes the largest change to the front character; the diffuser makes the largest change to the rear. This staged approach is also useful for owners who want to spread the project across more than one installation visit. The RS6 collection keeps the complete kit and every individual component together. Carbon Fiber, Gloss Black and special finishes Most current RS6 component listings present two clear directions. Visible Carbon Fiber makes the weave part of the design. Gloss Black creates a quieter, dark finish and uses a basalt-fiber construction rather than visible carbon weave. Matte carbon, forged carbon and other special-finish requests should be confirmed component by component before ordering. Availability can change, and a finish that exists for one part should not be assumed to exist for all seven. If the car has Audi Black Optics or factory matte carbon details, send clear photographs to the Setup Advisor so the closest direction can be discussed before production. Real Audi RS6 C8 builds Renders are useful for understanding design intent. Installed cars show whether the program still belongs on a working Avant. These customer and partner builds demonstrate four different visual outcomes. They are shown as design references; the exact installed component list varies by vehicle and should not be inferred from a single photograph. Japan: the full profile in motion The moving three-quarter view shows how the lower front and side treatment read across the Avant’s full length. EU white build: maximum contrast On a white car, the boundary between the factory body and the dark lower components is easy to read. EU black build: quieter integration Dark-on-dark bodywork makes the same program read with less contrast and a more understated finish. Wuhan: front-end definition on a black car The low front three-quarter angle shows how the lip, centre and bumper corners work together without relying on colour contrast. View more RevoZport Street Program builds in the Gallery. OEM-style fitment without turning the order into a technical exercise Standard RevoZport Street Program components are engineered for plug-and-play, model-specific integration using the vehicle’s existing mounting locations, with no cutting or drilling required unless the relevant product page explicitly states otherwise. Test-fitting before final installation is still good practice, especially when several panels meet or when a special finish has been ordered. The live collection lists this program for the Audi RS6 C8 Avant from 2020 onward. Before ordering, confirm the vehicle’s model year, market, trim and any relevant camera or sensor specification. That is not meant to make fitment complicated; it prevents a simple naming assumption from becoming an expensive shipping mistake. For the hood, grille, bonded spoiler and any multi-part installation, an experienced body and carbon-fiber installer can also help with panel alignment, transfer of factory items and finish protection. Product-specific instructions take priority over any general statement in this article. What to confirm before ordering Your RS6 C8 Avant model year, market and trim. Whether you want the complete seven-component program or a staged setup. The exact finish for every selected component. Any factory exterior package, camera or sensor details relevant to the selected part. Your installer and preferred delivery timing, particularly for the oversized hood or a complete kit. Send the Setup Advisor a photograph of the car, the model year and the parts you are considering. The team can then help organise a coherent setup instead of treating each component as a separate purchase. Frequently asked questions Is the RevoZport RS6 C8 Street Program an original design? Yes. It was designed by RevoZport as one coordinated RS6 C8 exterior program. It is not a relabelled replica, an A6-to-RS6 conversion or an imitation of another tuner’s kit. What is included in the complete RS6 C8 program? The complete program combines seven items: front lip, front grille, front canards, hood, side skirts, rear diffuser and roof spoiler. Check the live complete-kit product before ordering because product specifications can be revised. Can I buy the parts individually? Yes. Every component is listed separately, and the full body kit is available for owners who want the complete composition. Is this a widebody kit? No. The Street Program works with the factory RS6 C8 Avant body rather than converting it into an extreme widebody. Does installation require cutting or drilling? Standard Street Program components are designed for plug-and-play, OEM-style fitment with no cutting or drilling. If a component requires anything different, the relevant product page or installation instructions will state it. Which model years are supported? The live collection lists the Audi RS6 C8 Avant from 2020 onward. Confirm the exact year, market and vehicle specification with RevoZport before ordering. Is Gloss Black the same as visible carbon fiber? No. RevoZport’s current Gloss Black option uses a basalt-fiber construction and provides a uniform dark appearance rather than a visible carbon weave. Can RevoZport help me choose a setup? Yes. Share your vehicle year, market, photographs and preferred finish with the Setup Advisor. The team can help compare a complete program with a staged component plan. Build your RS6 C8 Street Program The strongest setup is not automatically the one with the most parts. It is the one in which the front, side and rear feel intentional together. Start with the complete program, compare the individual components, or speak with a specialist before ordering. Shop the Audi RS6 C8 Street Program Explore the complete seven-component body kit Ask the RevoZport Setup Advisor on WhatsApp or email contact@revozport.com.
How Revozport Develops the BMW G82 M4 Carbon Fiber Aero Kit
Aero

July 21, 2026

How Revozport Develops the BMW G82 M4 Carbon Fiber Aero Kit

For many BMW G82 M4 owners, an aerodynamic upgrade is not only about making the car look more aggressive. The G82 M4 already has a strong factory presence, a wide front-end design, and a performance character that is unmistakably BMW M. But when a car is designed to perform at higher speeds, appearance alone is not enough. A proper carbon fiber aero kit needs to work with the vehicle’s original body structure, airflow behavior, and dynamic limits. It must improve visual presence while also supporting real aerodynamic function, structural stability, and precise fitment. This is why the development of the Revozport BMW G82 M4 carbon fiber aero kit begins long before production. From full-vehicle 3D scanning and CAD surface development to CFD simulation, structural engineering, dry carbon fiber manufacturing, and real-world validation, every stage is built around one goal: creating an aero package that feels naturally integrated with the G82 M4. The G82 M4's Aerodynamic Starting Point The BMW G82 M4 arrives from the factory with an aggressive aerodynamic stance. Its wide front fascia, large kidney intakes, muscular body proportions, and strong rear profile give the car an unmistakable performance identity. However, aggressive appearance and optimized aerodynamic function are not the same thing. At speed, the G82 M4’s large front surface area, front bumper geometry, and wheel arch zones all influence airflow behavior. The front end can generate lift under high-speed conditions, while turbulence around the front wheel arches may affect stability during high-load cornering. For an aero development team, these are not styling problems. They are airflow management problems. The Revozport G82 M4 aero program targets these specific areas by designing surfaces that redirect airflow with precision. The goal is not to add visual bulk to the car, but to refine the way air moves around it. A well-developed aero kit should make the G82 M4 look more focused, but it should also make the body lines feel more purposeful. Full-Vehicle 3D Scanning No serious aerodynamic development should begin from guesswork or generic geometry. The first step in the Revozport development process is a full-vehicle 3D scan of the BMW G82 M4. This captures the actual surface data of the car, including the areas that directly affect aerodynamic behavior and installation accuracy. The scan covers key zones such as: · Front bumper geometry · Front intake and grille areas · Underbody panel transitions · Brake cooling pathways · Front wheel arch profiles · Side body transitions · Rear bumper and diffuser zones · Mounting points and factory panel gaps This digital scan becomes the foundation of the entire development process. Instead of designing parts around estimated dimensions, the engineering team works from a digital twin of the actual vehicle. This allows every component to be developed in relation to the original body structure. Fitment is not something corrected at the final installation stage. It is controlled from the beginning of development. Every surface, edge, mounting point, and transition line is referenced back to the original scan data. This helps reduce the tolerance issues often seen in aero kits developed from generic CAD files or incomplete vehicle measurements. CAD Surface Development After the 3D scan is completed, the vehicle data is translated into the CAD development environment. This is where the design begins to take shape — but not only from a styling perspective. Each component is developed with a defined aerodynamic purpose. A front lip is not simply designed to look lower. It needs to help manage airflow under the front bumper and contribute to front-end stability. A canard is not only a visual detail. It needs to influence airflow around the bumper corner and wheel arch area. A rear diffuser is not only a rear styling upgrade. It needs to work with the underbody airflow and help improve the rear aerodynamic balance. During CAD surface development, the team defines the function of each part: · Increasing front-end stability · Improving airflow direction around the front bumper · Managing turbulence near the front wheel arches · Supporting brake cooling airflow · Improving side-body airflow transition · Enhancing rear-end aerodynamic balance At the same time, visual integration is carefully controlled. The BMW G82 M4 already has a very strong design language. An aero kit that ignores this can easily look disconnected or overly aftermarket. For this reason, the Revozport package is developed as an OEM+ expression — a natural extension of BMW’s original design intent, but with a sharper and more performance-focused presence. The final design needs to look like it belongs on the car, not like it was simply added onto it. CFD Simulation & Aerodynamic Optimization Once the CAD surfaces are developed, the models are exported for CFD simulation and aerodynamic analysis. CFD simulation allows the engineering team to study how air behaves around the complete vehicle, not only around a single component. This is important because an aerodynamic part does not work alone. The front lip affects front-end pressure. Front canards affect wheel arch turbulence. Side airflow influences rear-end stability. The rear diffuser depends on how air reaches the lower rear section of the vehicle. The complete package must be evaluated as a system. During simulation, several key parameters are analyzed: · Pressure distribution across the splitter, canards, and rear diffuser · Airflow velocity through front-end intake areas · Mass flow behavior around brake cooling pathways · Turbulence generation near the front wheel arches · Air separation behavior around the side body · Rear-end airflow management Drag behavior across different speed ranges The CFD process is not a single approval step. Designs are modified, re-simulated, and evaluated repeatedly. If a surface creates unnecessary drag, unstable airflow, or poor pressure distribution, it is revised. If one component negatively affects another part of the package, the system is adjusted again. This iterative process is what separates a visually styled body kit from a properly engineered aero package. For the G82 M4, the aim is to create a sharper and more stable aerodynamic profile while maintaining the car’s street usability and visual refinement. Structural Engineering Aerodynamic performance also creates structural responsibility. As vehicle speed increases, aerodynamic loads increase dramatically. A component that looks stable at low or moderate speeds may experience much greater force at the performance limits of a BMW M car. For this reason, structural engineering is a key part of the Revozport development process. The engineering team defines the structure of each component based on its function and expected load case. This includes: · Carbon fiber ply count · Fiber orientation · Reinforcement zones · Core material selection where required · Mounting point geometry · Bracket and interface design · Load distribution across the component The mounting system is especially important. A carbon fiber part must not flex excessively under aerodynamic pressure, braking load, vibration, or cornering force. If the mounting interface is weak, even a well-designed aerodynamic surface can lose efficiency or create fitment issues over time. For the G82 M4 aero kit, every major component is engineered to maintain its shape and position under real driving conditions. The goal is not only to achieve a precise installation on day one, but also to preserve stability and fitment after repeated high-speed use. Prepreg Dry Carbon Fiber Manufacturing After the design and engineering stages are completed, the components move into dry carbon fiber production. The G82 M4 aero components are manufactured using aerospace-grade prepreg carbon fiber and controlled autoclave curing. Compared with traditional wet carbon fiber processes, prepreg dry carbon fiber offers better control over resin content, This manufacturing process helps create parts that are: · Lightweight · Strong · Dimensionally stable · Consistent in fiber-to-resin ratio · Cleaner in weave appearance · More suitable for high-performance aero use For a visible exterior carbon fiber part, surface quality is just as important as structure. The depth of the weave, the consistency of the pattern, and the clarity of the finish all reflect the quality of the manufacturing process. A premium carbon fiber aero kit should not only perform well — it should also look precise, clean, and production-grade. Each component is visually inspected against reference standards before release. Edges, weave direction, gloss level, surface consistency, and mounting areas are all checked to ensure the final product meets the expected quality level. Real-World Testing & Validation Simulation is essential, but it is not the final answer. Every aerodynamic prediction must be validated under real dynamic conditions. This is why the complete BMW G82 M4 aero package goes through real-world testing after the design and manufacturing stages. During validation, the team evaluates the full aero package in conditions closer to actual performance driving. The focus is not only on how the kit looks on the car, but how it behaves when the vehicle is moving at speed. Key testing areas include: · Front-end stability · High-speed confidence · High-load cornering behavior · Component rigidity · Mounting stability · Airflow consistency · Fitment after dynamic use The purpose of validation is to confirm whether real-world behavior matches the expectations from CFD and structural analysis. If the result does not meet the target performance envelope, the engineering loop continues. The design is reviewed, adjusted, and tested again until the final package achieves the required balance between aerodynamic function, structural reliability, and visual integration. A Complete Aero Solution for the BMW G82 M4 The development of the BMW G82 M4 carbon fiber aero kit is not a simple styling project. It is a complete process that connects vehicle scanning, digital engineering, aerodynamic simulation, structural design, dry carbon fiber manufacturing, and real-world validation. For G82 M4 owners, this matters because the final product is not just a collection of carbon fiber parts. It is a complete aero solution designed around the actual vehicle platform. The result is a sharper, more focused, and more complete expression of the G82 M4 — one that enhances the car’s factory performance identity while adding the precision, texture, and aerodynamic purpose expected from a high-level carbon fiber upgrade.
BMW G09 XM Dry Carbon Fiber Upgrade: Full REVOZPORT Body Kit Installation Case
Street

July 13, 2026

BMW G09 XM Dry Carbon Fiber Upgrade: Full REVOZPORT Body Kit Installation Case

hen a flagship performance SUV like the BMW G09 XM meets a full dry carbon fiber upgrade, the goal is never just to make the car look more aggressive. The BMW G09 XM already carries a strong presence from the factory. It is large, powerful, and unmistakably part of the BMW M family. For the owner of this XM, the purpose of the upgrade was very clear: the car needed to look stronger, lower, and more distinctive, but without losing the luxury character and factory design language that make the XM special. This was not a build designed only for photos. The owner wanted a more complete and refined exterior upgrade — something that could enhance the SUV’s road presence while still looking mature, clean, and suitable for everyday street use. That’s why this car owner ultimately chose the Revozport BMW G09 XM full bodykit. The Owner’s Goal: Stronger Presence Without Losing Luxury Before the installation, the owner’s expectations were very specific. He wanted the XM to have a stronger visual impact, especially from the front and rear. At the same time, he did not want the car to look overdone or disconnected from the original design. For a vehicle like the G09 XM, balance is extremely important. Too much styling can easily make the car feel heavy or exaggerated, while the right details can make the body lines look sharper and more premium. The key goals for this build were: · Enhance the overall road presence · Make the SUV look lower, wider, and more powerful · Improve the premium appearance through real dry carbon fiber texture · Maintain the original BMW M design language · Keep the final result clean, coordinated, and street-friendly Why Dry Carbon Fiber Was Chosen For this BMW G09 XM, the owner chose dry carbon fiber because of its lightweight structure, refined texture, and higher-quality finish. Compared with traditional wet carbon fiber parts, dry carbon fiber offers several clear advantages: · Lighter weight · Higher structural strength · Better durability · Cleaner and more consistent carbon fiber texture · More premium surface appearance On a large performance SUV like the XM, these details matter. The carbon fiber parts need to match the scale and luxury level of the car. A deep gloss finish, clean weave direction, and precise edges help the final build look more like a high-level OEM+ upgrade rather than an aftermarket add-on. Full BMW G09 XM Dry Carbon Fiber Upgrade List This installation included a complete dry carbon fiber exterior package: · Dry Carbon Front Lip · Dry Carbon Front Bumper Air Vent Trims · Dry Carbon Hood · Dry Carbon Side Skirts · Dry Carbon Fender Flares · Dry Carbon Door Trims · Dry Carbon Roof Spoiler · Dry Carbon Tailgate Trim · Dry Carbon Rear Diffuser Installation Preparation Before installation, the team first carried out full vehicle protection, product inspection, test fitting, positioning measurement, and installation planning. This preparation helped ensure that every part could be installed safely, accurately, and in line with the original body structure. BMW G09 XM Dry Carbon Kit Installation Front Lip Installation The front lip is the first part that builds the lower and more aggressive front-end stance of the BMW G09 XM. During installation, the key points are center alignment, left-right symmetry, and even bottom fixation. 1. Safely lift the front of the vehicle to access the lower mounting points of the front bumper. 2. Clean the lower edge of the front bumper, especially the areas where the 3M tape will be applied. 3. Apply 3M tape to the designated bonding areas on the product. 4. Since this is a three-piece front lip, first test-fit the parts and confirm the best symmetrical position on both sides. 5. Remove the corresponding original screws from the vehicle. 6. Align the side extensions of the front lip, confirm the angle, then peel off the 3M tape backing and press firmly into place. 7. Reinstall the removed screws together with the product and tighten them evenly. Front Bumper Air Vent Trim Installation 1. Test-fit the front bumper air vent trims first to confirm the correct position. 2. Clean the installation area with ethanol, then clean the bonding surface on the back of the product. 3. Apply 3M tape to the designated bonding areas on the product. 4. Align the air vent trims with the original bumper position, peel off the 3M tape backing, and press firmly into place. 5. Repeatedly check and adjust the gaps to ensure both sides are symmetrical and achieve an OEM-level fitment effect.Installation Results for the Front Lip and Front Bumper Air Intakes Side Skirt Installation The side skirts define the extension of the side profile. When installed correctly, they make the vehicle look lower, longer, and more planted. 1. Test-fit the side skirts first and confirm that the front and rear ends transition smoothly with the original wheel arches. 2. Remove the corresponding original screws from the vehicle. 3. Clean the lower side skirt installation area on the vehicle. 4. Clean the bonding areas on the back of the product and apply 3M tape. 5. Align the side skirt with the body line. Start positioning from the middle section, then gradually press toward the front and rear ends. 6. Use the original screws to secure the product through the reserved mounting holes at the bottom. 7. After installation, check the body line from a low angle to confirm that the side skirt fits naturally and both sides are at the same height. Door Trim Installation 1. Remove the original door trim and test-fit the carbon fiber door trim to confirm the position. 2. Clean the installation area with ethanol, then clean the bonding surface on the product. 3. Apply 3M tape to the designated bonding areas on the back of the product. 4. Align the carbon fiber door trim with the original mounting position, peel off the 3M tape backing, and press firmly into place. 5. Repeatedly check and adjust the gaps to ensure both sides are symmetrical and the final fitment follows the original door line. Fender Flare Installation 1. Remove the original fender flares and test-fit the carbon fiber fender flares to confirm the position. 2. Clean the installation area with ethanol, then clean the bonding surface on the product. 3. Apply 3M tape to the designated bonding areas on the back of the product. 4. Align the carbon fiber fender flares with the original body contour, peel off the 3M tape backing, and press firmly into place. 5. Repeatedly check the gaps and body line to ensure both sides are symmetrical and the carbon fiber fender flares follow the original factory shape naturally. Rear Diffuser Installation The rear diffuser is one of the most important visual sections of the rear end. It must work together with the exhaust area, parking sensors, light strip, and rear bumper structure. 1. Remove the original rear bumper assembly and related fixing parts carefully to avoid damaging the original clips. 2. Separate the bumper skin from the original rear diffuser, then remove the original parking sensors and light strip. 3. Assemble the bumper skin with the carbon fiber rear diffuser, and transfer the original parking sensors and light strip onto the carbon fiber product. 4. Align the complete rear bumper assembly with the original mounting holes and press it into place from the center outward. Make sure all wiring connectors are properly connected. 5. Tighten the screws, then test the parking sensors and light strip to confirm that everything works normally after installation. Roof Spoiler Installation 1. Test-fit the roof spoiler first to confirm the correct position. 2. Clean the installation area with ethanol, then clean the bonding surface on the back of the product. 3. Apply 3M tape to the designated bonding areas on the product. 4. Align the roof spoiler with the original roofline, peel off the 3M tape backing, and press firmly into place. 5. Check both sides carefully to ensure the roof spoiler is centered and evenly aligned. Tailgate Trim Installation 1. Test-fit the tailgate trim first to confirm the correct position. 2. Clean the installation area with ethanol, then clean the bonding surface on the product. 3. Apply 3M tape to the designated bonding areas on the back of the product. 4. Align the carbon fiber tailgate trim with the original tailgate line, peel off the 3M tape backing, and press firmly into place. 5. Repeatedly check the gap and alignment to ensure a clean and natural rear-end finish. Carbon Fiber Hood Installation The carbon fiber hood is one of the most important parts of this full dry carbon fiber upgrade. During installation, panel gaps, height, locking function, and front-end body lines must all be carefully adjusted. 1. Open the original hood and record the original left and right panel gaps, as well as the height reference. 2. Remove the original washer nozzles, heat insulation pad, hood latch, and any other transferable components. 3. Remove the original hood with two installers working together to avoid damaging the fenders. 4. Place the carbon fiber hood onto the vehicle and lightly install the screws first. Do not fully tighten them at this stage. 5. Adjust the gaps between the carbon fiber hood and the fenders on both sides. 6. Check the height relationship between the front edge of the hood and the upper edge of the front grille. 7. Install the hood latch and confirm that the hood opens and closes smoothly. 8. If the hood comes with vents or air guide structures, check the underside clearance and make sure there is no interference with original components. 9. After the best position is achieved, tighten all screws evenly and in sequence. 10. Finally, check the opening, closing, locking function, and whether the front-end body line looks smooth and natural. Final Result: Wider, Lower, and More Complete After the full installation was completed, the change was immediately visible. The BMW G09 XM looked wider, lower, and more aggressive, but not excessive. The carbon fiber elements started from the front lip and continued through the hood, side skirts, fenders, door trims, roof spoiler, tailgate trim, and rear diffuser, creating a unified exterior design. From the owner’s perspective, this was exactly the effect he wanted. The vehicle gained a stronger presence without becoming too flashy. It looked more special, more complete, and more personal, while still keeping the luxury and street usability of the original XM. The installer’s feedback was also focused on fitment. Throughout the process, each part was repeatedly checked, adjusted, and aligned with the factory mounting logic. The final result looked natural on the vehicle, as if the carbon fiber package had always belonged there. Luxury Feel and Detail Quality The biggest difference after the installation was not only the more aggressive stance, but also the improvement in texture. The dry carbon fiber weave, deep gloss finish, and clean surface quality added a more premium feeling to the entire vehicle. On a flagship SUV like the BMW XM, these details are important because the car already has a strong luxury identity. The carbon fiber upgrade needed to enhance that feeling, not conflict with it. The final appearance was closer to an OEM+ high-performance edition — more distinctive than the factory car, but still refined enough for daily street use. A More Complete Expression of the BMW XM A true exterior upgrade should not take away from the original character of the vehicle. It should understand it, refine it, and bring out what was already there. For this BMW G09 XM, the transformation is not about adding excessive visual drama. It is about giving the car a stronger presence, a more defined stance, and a more complete identity. The dry carbon fiber elements extend naturally from the front to the rear, allowing the entire vehicle to feel more connected, more powerful, and more intentional. This is also the value of a well-developed REVOZPORT upgrade. It gives the owner more than a new exterior look; it gives the vehicle a clearer expression of power, craftsmanship, and individuality.
C6 Corvette Body Kit: Build a 2006-2013 Carbon Fiber Aero Setup
Aero

July 01, 2026

C6 Corvette Body Kit: Build a 2006-2013 Carbon Fiber Aero Setup

A C6 Corvette body kit should make the 2006-2013 Corvette look sharper, lower, and more complete without covering up the shape that made the C6 age so well. The long hood, low roofline, and wide rear stance are already part of the car’s appeal, so the right carbon fiber aero setup should add definition instead of noise.RevoZport’s C6 Aero Program gives owners six carbon fiber upgrade areas across the front, hood, sides, and rear. You can start with one section, such as the splitter, side skirts, or diffuser, or build toward a full C6 Corvette body kit with one consistent exterior direction. What Does the RevoZport C6 Aero Program Include? The RevoZport C6 Aero Program gives the 2006-2013 Corvette a complete carbon fiber upgrade path across the front, hood, side profile, and rear. The program includes the Splitter & Air Dam, Hood, Side Fenders, Side Skirts, Rear Spoiler, and Rear Diffuser, so the car can be built by area without losing one consistent design direction. For C6 owners, that matters because the Corvette already has a strong shape. A single front lip can sharpen the nose, but it will not complete the whole car. A full exterior package can work well, but only when the front, sides, hood, and rear feel connected. RevoZport’s c6 corvette body kit gives you a model-specific way to build that connection through carbon fiber aero parts. The result is not a random parts list. It is a C6-focused aero program for owners who want the car to look lower, cleaner, and more complete while keeping the Corvette’s original proportions at the center of the build. Six Carbon Fiber Parts for the 2006-2013 Corvette A C6 Corvette body kit from RevoZport can be built from these 6 product areas: Splitter & Air Dam: This changes the front edge of the Corvette and gives the nose a sharper carbon fiber finish. Hood: This creates a stronger focal point from the front and three-quarter view. Side Fenders: These add more visual presence around the side of the car. Side Skirts: These make the lower side line feel more connected from front to rear. Rear Spoiler: This gives the upper rear section a more finished carbon fiber accent. Rear Diffuser: This adds shape and depth to the lower rear view. That spread is useful. You can start with one area, or you can plan the exterior as one full package. Aero Program, Not a Random Exterior Add-on List The best C6 builds usually work because the parts feel connected. The nose, hood, side profile, and rear all need to support the same visual direction, especially on a car with such a long hood and broad rear stance. A splitter sharpens the nose. Side skirts stretch the lower side line. A diffuser and spoiler give the rear more depth and finish. The hood adds a high-visibility carbon fiber point that changes how the whole car reads from the front. When these parts share one design direction, the C6 looks more resolved. RevoZport’s C6 Aero Program focuses on that kind of exterior balance. It can help the Corvette look lower, wider-looking, and more purposeful through carbon fiber parts across the car. Start With the C6 Build Direction, Not the Parts List Choose C6 aero parts by the build direction first. Some owners want clean carbon fiber details. Some want the car to sit lower visually. Others want a stronger side profile or a full carbon fiber aero build. That approach fits the C6 better than a one-size-fits-all package ladder. A C6 Corvette already has a long hood, low roofline, and strong rear haunches. The wrong part combination can make it look busy. The right combination makes the car feel sharper without losing its factory character. Clean Carbon Fiber Street Look A clean carbon fiber street look works best if you want to keep the C6 proportions mostly intact. This direction fits owners who like the stock shape but want more definition. You are not trying to make the car look like a race conversion. You are adding carbon fiber in the areas people notice first: the front edge, lower rear, and rear deck. For this build style, focus on: Splitter & Air Dam: The front gets a sharper lower edge without changing the whole side profile. Rear Diffuser: The back looks more finished, especially from low rear angles. Rear Spoiler: The upper rear gains a clean carbon fiber accent. This is a good route if your Corvette still sees regular street use, weekend drives, cars and coffee, or long highway days. It gives the car more presence without making the whole build feel too heavy. Lower and More Purposeful Stance A lower-looking stance comes from how the front splitter, side skirts, and rear diffuser visually frame the car. Important detail: a body kit does not lower the suspension. Ride height comes from springs, coilovers, tire size, and chassis setup. The aero parts create a lower visual line around the body. That is why a C6 can look more planted even before any suspension changes enter the conversation. For a lower-looking C6 Corvette body kit direction, choose parts that shape the lower perimeter: Front Splitter & Air Dam: The nose looks closer to the road. Side Skirts: The rocker area appears longer and more grounded. Rear Diffuser: The rear bumper gains a deeper lower finish. This combination is the visual version of tightening a suit. The C6 is still the C6, but the lines look sharper and more deliberate. Stronger Side Profile Some owners searching for c6 corvette wide body kit or corvette c6 body kit are looking for a broader side view, not always a cut-body conversion. For the C6 Aero Program, the more accurate idea is a wider-looking side profile with a more planted visual effect. Side fenders add presence around the side body area. Side skirts extend the lower line and keep the profile from looking front-heavy or rear-heavy. Together, they help the C6 look broader and more settled while staying within the language supported by the C6 Aero Program. This is the right direction if you want the Corvette to look wider from the side without describing it as a full metal widebody conversion. How the C6 Aero Parts Shape Each View of the Car Each C6 aero part changes a different viewing angle. The front pieces sharpen the nose, the side pieces strengthen the profile, the rear pieces complete the tail, and the hood becomes the visual centerpiece. A strong C6 Corvette body kit should make those angles feel connected. The front, side, rear, and hood do not need to compete for attention. They should build one exterior direction around the Corvette’s long hood, low roofline, and wide rear stance. Front End: Splitter & Air Dam The Splitter & Air Dam changes the first angle most people notice on a C6 Corvette: the front. The C6 already has a naturally low nose, but the factory front can look softer than newer performance cars. A carbon fiber splitter and air dam adds a cleaner lower edge and gives the nose more intent without changing the whole body. This front-end direction works well when the car needs more definition at the lower bumper. It gives the C6 a sharper first impression and helps the front match stronger rear or side carbon fiber pieces. Key front-end details to review: Front Edge Definition: The splitter gives the nose a cleaner, lower outline. Visual Balance: A front carbon fiber part can help balance a car that already has rear accents. Lower Bumper Structure: The air dam gives the front more presence without changing the whole exterior. Carbon Fiber Focus: This is a focused change for owners who want the front of the car to feel more finished. Side View: Side Fenders and Side Skirts The side view is where the C6 can gain more visual length, stance, and body presence. Side skirts draw a clean line between the front and rear wheels. They make the lower body look more continuous. Side fenders add more presence around the wheel area and support a wider-looking stance from the front three-quarter, side, and rear three-quarter views. This pairing is important when the front already has a splitter or air dam. The side skirts carry that lower visual line through the body, while the side fenders give the profile more strength around the wheel area. For a corvette c6 body kit, the side pieces should be judged by how well they follow the factory body lines: Side Continuity: Side skirts keep the lower profile connected from front to rear. Planted Stance: Side fenders and skirts help the car look lower, broader, and more settled. Carbon Fiber Balance: The side pieces help the build feel complete instead of front-heavy. Panel Alignment: Clean side fitment depends on how the parts meet the rocker area, wheel arch, and surrounding body lines. Rear Finish: Spoiler and Diffuser The rear spoiler and rear diffuser finish the C6 from the back, where the Corvette already has one of its strongest factory views. The C6 rear is wide and clean, so rear carbon fiber parts need to add structure without making the tail feel crowded. A diffuser adds depth to the lower rear bumper. A spoiler gives the upper rear section a more defined edge and helps the tail connect with the rest of the aero package. Rear parts work best when they support the same design direction as the front and sides: Rear Visual Weight: The spoiler and diffuser help the rear match a sharper front end. Lower Rear Depth: The diffuser gives the bumper more structure from low rear angles. Upper Rear Definition: The spoiler adds a clean carbon fiber accent to the top of the tail. Full Aero Balance: In a complete C6 Corvette body kit, the rear pieces should feel connected to the splitter, side skirts, side fenders, and hood. Hood as the Visual Centerpiece The hood is the highest-visibility part in the C6 Aero Program. A carbon fiber hood changes the car’s presence from the front, three-quarter angle, and driver-side walk-up view. It is not a small accent. On a Corvette with a long front section, the hood becomes one of the first parts people notice. The hood works best when it supports the rest of the carbon fiber layout. If the build already has front and side carbon fiber pieces, the hood helps connect the upper body with the lower aero. On a mostly stock exterior, it creates a stronger focal point and gives the car a more dramatic front presence. For a high-end C6 build, the hood should support the full exterior direction. Its main role is visual hierarchy: it gives the upper body a stronger carbon fiber focus and helps the front, sides, and rear feel more connected. Cooling, weight, and construction details should be checked on the exact product page when those details matter to the build. One Area or the Full C6 Aero Setup? Buy one area first if you are testing the look. Build the full C6 aero setup if you want one consistent carbon fiber exterior language across the front, side, rear, and hood. This is where the buying decision becomes practical. You do not need to buy everything at once. You also do not need to stay with one part forever. A C6 Corvette body kit can grow by area as long as the final direction stays clear. Start With One Area if You Are Testing the Look A one-area upgrade works well when you want to see how carbon fiber fits your Corvette before going further. You can start with the front, side, or rear. Each path changes the car in a different way. Front First: Choose the Splitter & Air Dam if the nose needs sharper definition. Side First: Choose Side Skirts or Side Fenders if the profile needs more stance. Rear First: Choose the Rear Diffuser or Rear Spoiler if the tail feels too plain. Hood First: Choose the hood if you want a bold centerpiece and already like a more dramatic build. This route is good for owners who want to control budget, plan installation in stages, or live with the first change before adding more. There is nothing wrong with that. A careful gradual build usually beats a rushed full build. Go Complete for One Visual Language A full C6 Aero Program setup makes sense when you want the entire exterior to feel designed together. A cohesive carbon fiber C6 build uses the same visual language across the front, sides, rear, and hood. The car does not look like it collected parts over time. It looks like the owner had a plan. A complete setup fits C6 owners who want: Matched Carbon Fiber Presence: The same material language appears across the car. Balanced Exterior Weight: The front, side, and rear all carry visual strength. A Stronger Show Build: The car looks more complete in photos and in person. One Buying Path: The C6 Aero Program keeps the parts under one collection. The full setup is not mandatory. It is simply the best match for owners who already know they want a complete carbon fiber exterior. Before Finalizing: Fitment, Finish, and Installation Before choosing C6 Corvette aero parts, confirm the model year, current body condition, carbon fiber finish, product photos, mounting areas, and installation plan. A good-looking part still needs the right car, the right surface condition, and the right installation approach. Fitment checks matter more on a C6 because the car is now an older performance platform. Many 2006-2013 Corvettes have been modified, repaired, repainted, or fitted with previous aftermarket parts. Those details can affect how a splitter, side skirt, diffuser, spoiler, or hood sits once installed. Model Year and Vehicle ConditionRevoZport lists the C6 Aero Program for the 2006-2013 Corvette. Start with the model year, then review the car’s current exterior condition. Look closely at the bumper edges, rocker areas, rear bumper, panel gaps, mounting points, paint finish, and any old hardware locations. A clean installation depends on both the new carbon fiber part and the condition of the surface it mounts to. Check these details before finalizing the setup: Model Year: Confirm your Corvette falls within 2006-2013. Body Panels: Look for previous repairs, uneven panel gaps, or non-factory body parts. Existing Parts: Note any aftermarket bumper, diffuser, spoiler, side skirt, or prior mounting hole. Mounting Areas: Check whether existing modifications may affect alignment or hardware placement. Paint and Clear Coat Condition: Carbon fiber can make nearby old finish issues more visible. Older performance cars deserve a closer fitment review before exterior parts are installed. That extra attention helps the carbon fiber parts sit cleaner and keeps the final build aligned with the C6’s original body lines. Carbon Fiber Finish and Product Photos Carbon fiber parts should be judged by finish, weave, edge quality, and installed appearance. Studio images are useful for seeing the surface, weave, and part shape. Installed photos show something different: how the part sits on the car once it meets the bumper, rocker area, panel gaps, and rear body lines. For a C6, look at how the splitter follows the front bumper, how the side skirts align along the rocker area, and how the diffuser sits against the rear. For broader installed-build reference, the official RevoZport Race Gallery is a useful place to study how carbon fiber aero parts look on complete performance builds. Use it as a visual reference for stance, part balance, and how front, side, and rear pieces work together. A C6 Corvette body kit buyer should check: Weave Appearance: The carbon fiber pattern should look consistent. Clear Coat: The surface should look even and suited for exterior use. Edge Finish: Edges should look clean and purposeful. Panel Alignment: Installed photos should show how the part follows factory body lines. Mounting Area: The part should appear secure and properly positioned. Do not assume every carbon fiber product uses the same construction method. Use the specific product page as the source for material details. Installation Planning Large carbon fiber exterior parts deserve careful installation. Splitter, side skirts, diffuser, hood, and side fenders all need alignment. Some owners may have enough experience for smaller parts, but professional installation is the safer recommendation for larger pieces. Daily drivers should also think about: Ground Clearance: Splitters and side skirts sit closer to the road. Parking Stops: A low front edge can meet a curb faster than expected. Driveway Angles: Approach steep entries with care. Trailer Loading: Low aero parts may need different ramp planning. Road Debris: Carbon fiber exterior parts need regular inspection and cleaning. The goal is not to make the car harder to own. The goal is to enjoy the upgrade without creating avoidable problems. Is a C6 Corvette Body Kit Worth It? A C6 Corvette body kit is worth it if you want a cleaner carbon fiber build, a lower and wider-looking presence, or a gradual path from single-area upgrades to a full aero setup. The C6 has aged well because the basic shape is simple and muscular. A good aero package should respect that. It should add definition, not noise. Worth It for a Cleaner Carbon Fiber Build The C6 Aero Program is worth considering if you want the front, side, rear, and hood to share a carbon fiber direction. A single part can help. A full set can make the car look planned. That is the real appeal of the RevoZport C6 Aero Program. It gives owners a way to move from one local upgrade to a complete carbon fiber exterior. Worth It for a Lower, Wider-Looking Presence The C6 Aero Program is also worth considering if you want a lower, wider-looking, more purposeful appearance. That stance comes from how the carbon fiber aero parts shape the car from the outside. The splitter lowers the front edge visually. The side skirts extend the lower body line. The side fenders add more presence around the side profile. The diffuser gives the rear more depth and structure. For owners searching for a c6 corvette wide body kit, the C6 Aero Program is best viewed as a way to create a broader-looking carbon fiber exterior. It gives the Corvette a wider visual stance without presenting the build as a cut-body metal widebody conversion. Keep It Area-Based if You Prefer a Gradual Build An area-based build works well if you are not ready for the full exterior package. Start with the front if the nose needs definition. Start with the rear if the tail needs more finish. Start with the side if the profile needs stance. Then add the next area when the car’s direction feels clear. A gradual build can still end up cohesive. You just need to choose parts from the same design direction. Match the C6 Aero Direction to Your Build Goal Start with the look you want from the car, then match the RevoZport C6 aero parts to that direction. A cleaner front end, a stronger side profile, and a fuller rear view all call for different parts. Build Goal Suggested Direction Why Cleaner Front End Splitter & Air Dam Gives the front of the C6 a sharper carbon fiber look Stronger Side Profile Side Fenders + Side Skirts Helps the side view look lower and more planted Finished Rear View Rear Spoiler + Rear Diffuser Gives the rear end a more complete carbon fiber finish Full Carbon Fiber Aero Build All 6 C6 Aero Program parts Fits a build that needs one consistent exterior direction Gradual Upgrade Plan Start by vehicle area Lets the owner build the front, side, or rear first A good C6 build does not have to start with every part at once. Start with the angle that feels unfinished, then build toward a complete carbon fiber exterior. For the full product range, view the C6 Corvette body kit collection. Summary A C6 Corvette body kit should respect the shape of the 2006-2013 Corvette while giving it a lower, sharper, and more complete carbon fiber aero look. The best result is a car that still reads as a C6, just with more definition in the areas that need it most. RevoZport’s C6 Aero Program gives owners six carbon fiber upgrade areas: front splitter, hood, side fenders, side skirts, rear spoiler, and rear diffuser. The splitter, diffuser, and spoiler suit a cleaner street build. The splitter, side skirts, and rear diffuser create a lower visual line. The side fenders and side skirts give the Corvette C6 body kit a stronger side profile. A complete C6 build should start with the look of the car, not just the parts list. Decide whether your Corvette should look cleaner, lower, wider-looking, or stronger from the rear. Then match the carbon fiber parts to that direction and review the product page for fitment details. Frequently Asked Questions What Years Does the RevoZport C6 Aero Program Fit? The RevoZport C6 Aero Program is listed for the 2006-2013 Corvette. Check your model year and current exterior setup before choosing any C6 aero part. What Parts Are Included in This C6 Corvette Body Kit? The C6 Aero Program includes 6 carbon fiber parts: Splitter & Air Dam, Hood, Side Fenders, Side Skirts, Rear Spoiler, and Rear Diffuser. These parts cover the front, hood, side profile, and rear of the car. Should I Install the Full C6 Aero Program at Once? You do not have to install every part at once. A full setup works well if you want one consistent carbon fiber exterior, while an area-based build lets you upgrade the front, side, or rear in stages. Do C6 Carbon Fiber Aero Parts Affect Daily Driving? They can affect how you approach steep driveways, parking stops, trailer ramps, and rough roads, especially lower parts like splitters and side skirts. Plan ground clearance and installation before adding lower aero parts.